Have you ever faced this type of problem: you wanted to capture both the front and back of a small product, but couldn’t get the perfect shot?
Capture the product front-to-back sharpness is one of the most common frustrations among photo editors and photographers.
Because physical camera lenses have strict depth-of-field limitations. You can only stop down your aperture so far before photo quality degrades.
To solve this problem, Photoshop has an amazing feature called “Focus Stack” or ‘Blend Layer”.
It’s an essential skill to learn for photo editors and product photographers. This technique is incredibly relevant for photo editors who want to update their commercial, product, or nature photo editing portfolio.
At Glossy Retouching, I’ve done thousands of images focus stacking for product photographers and e-commerce brands. Mostly for jewelry brands, and I’ve seen that jewelry photo editing often needs focus stacking for better output. Blending multiple exposure layers in one image can be complicated for beginner photographers.
In this guide, I’m sharing my exact focus stacking workflow and how you can avoid the common mistake.
But before that, if you are new to focus stacking, let’s understand what it is.
What is Focus Stacking?
Focus stacking, sometimes referred to as focal plane merging or z-stacking. It’s an advanced digital image processing technique. The core concept of this technique is to combine multiple images into a single composite image.

Photographers have been experimenting with depth of field blending for decades. Early iterations required painstaking manual masking in the darkroom or early digital software.
Today, advanced software like Photoshop analyzes a stack of images, identifies the sharpest pixels from each individual layer, and seamlessly stitches them together.
Consider a macro shot of a ring with a white pearl. If you look at the unstacked frames, the first image might only have the front of the ring in focus. The second image focus in back side of the ring in the same position. The third image focuses on small details of the white pearl.
None of these individual shots is usable for a high-end commercial campaign. However, when you run them through a stacking process, the final stacked result shows the entire ring in stunning, crisp detail.
That’s why it’s important to do focus stacking for a small product. Before getting into the tutorial, let’s understand why you need focus stacking in your workflow.
Why You Need Focus Stacking
You might wonder why you cannot simply use a smaller aperture to get everything in focus. Well, the physical lens limits are the primary reason that photographers rely on this post-processing technique.
Micro photographers rely heavily on this technique because of how proximity affects optics. When shooting extremely close to a subject, the depth of field shrinks to mere millimeters. Even at f/16, you might only get the very front eye of an insect in focus, while its body falls completely into a soft blur. Combining multiple shots is the only physical way to capture the entire subject sharply.
Product and commercial photography demands absolute perfection. Clients expect flawless clarity in jewelry, tech, and watch photography. A blurry diamond ring band can ruin a highly paid advertising campaign.
It’s a necessary and non-negotiable skill for photographers and photo retouchers who want to deliver high-polish retouched photos.
How to do Focus Stack in Photoshop (step-by-step)
Now, get into the main topic: how you can easily do focus stacking in Photoshop. I’m going to share my exact focus stakeholder work process here. It’s an easy and time-saving process. I’m always following 4 simple steps for focus stacking. Here they are-
Step-1: Organize the Photos and Camera RAW
The process begins before you even open the software. Proper preparation is essential for a clean result. First, organize all photos in one folder. Carefully check all photos. Are there any missing shots or any details missing in the photos? Check this.
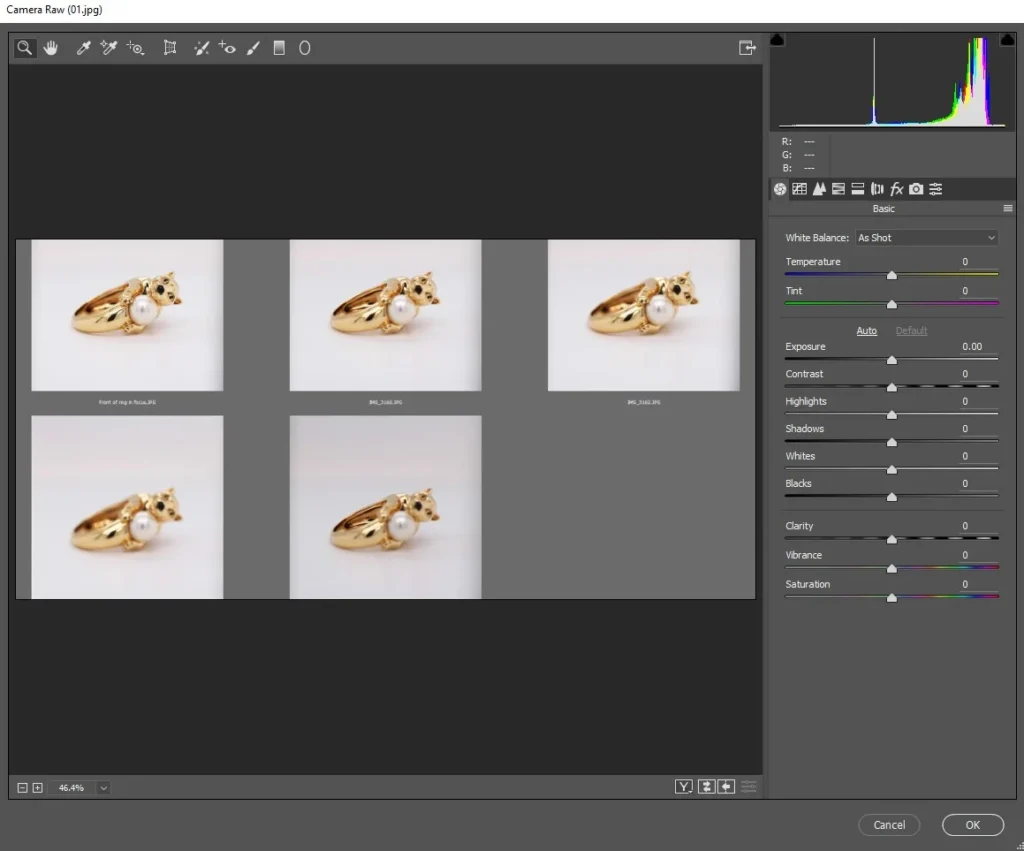
Open all raw photos into Adobe Camera RAW. Apply basic exposure corrections, white balance adjustments, and color grading to all photos. Keep in mind that brightness, exposure, etc., corrections keep consistency in all photos.
Step-2: Load the Photos into Photoshop
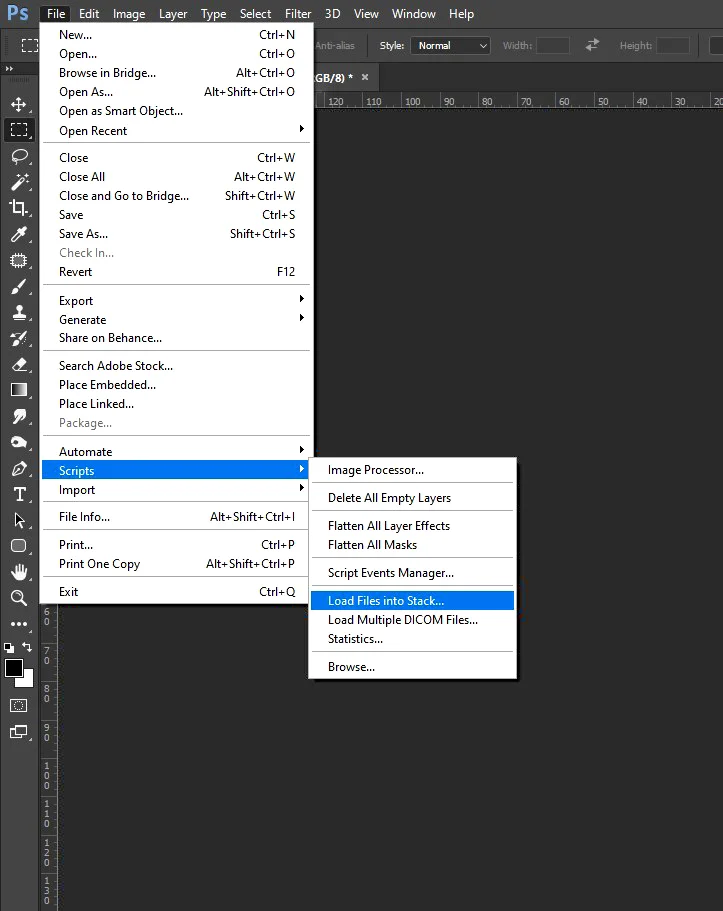
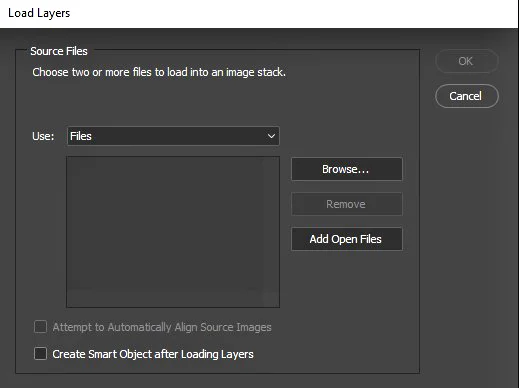
Once the basic correction is done, it’s time to open all files in Photoshop. Open Photoshop and navigate to the top menu. Go to file, drop down to Scripts, and click on load files into stack. A dialogue box will appear asking you to browse for your files. Select all the images from your sequence. Before you click OK, make sure to check the box labeled “Attempt to Automatically Align Source Images”.
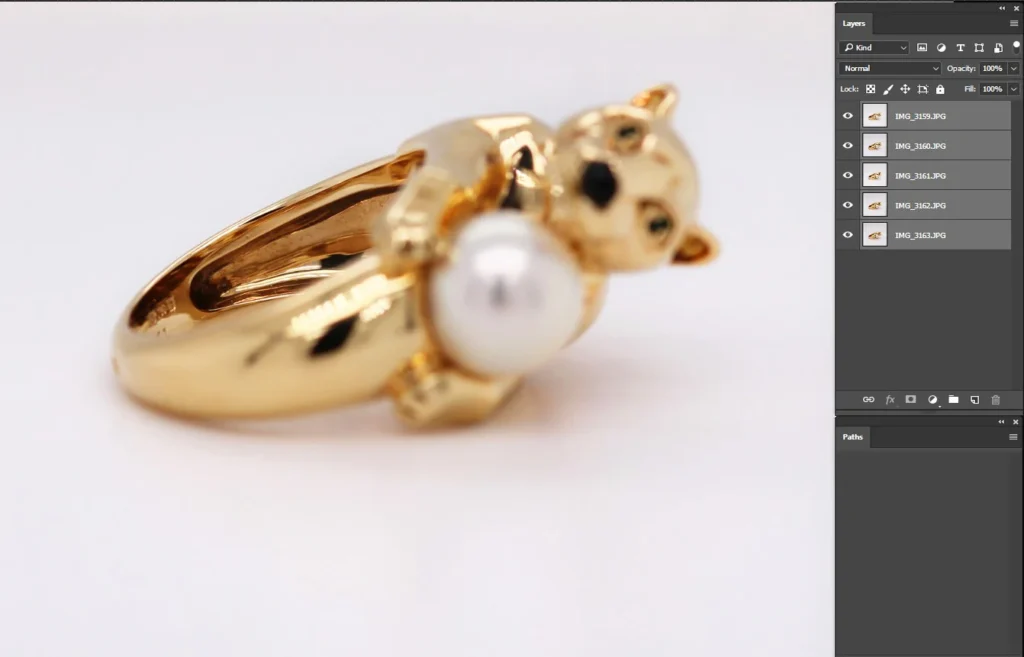
After clicking OK, you’ll see all photos have opened in the Layer bar (see screenshot below).
Then click the “Edit” option and go down to the “Auto-Align Layers” option. This option is for aligning all photos. When you click the option, you’ll see a dialogue box, select the “Auto” option, and click ok.
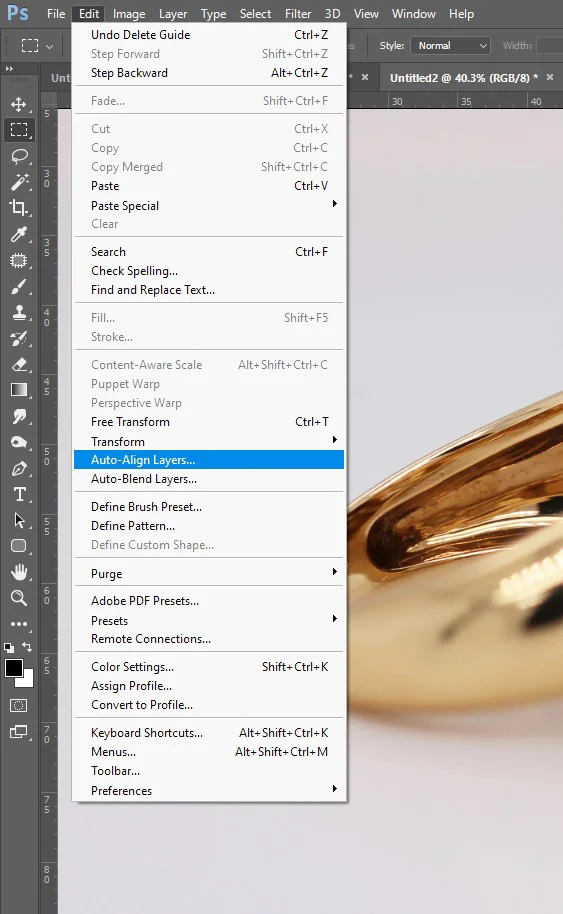

This way, all photos will auto-align based on the main product focus.
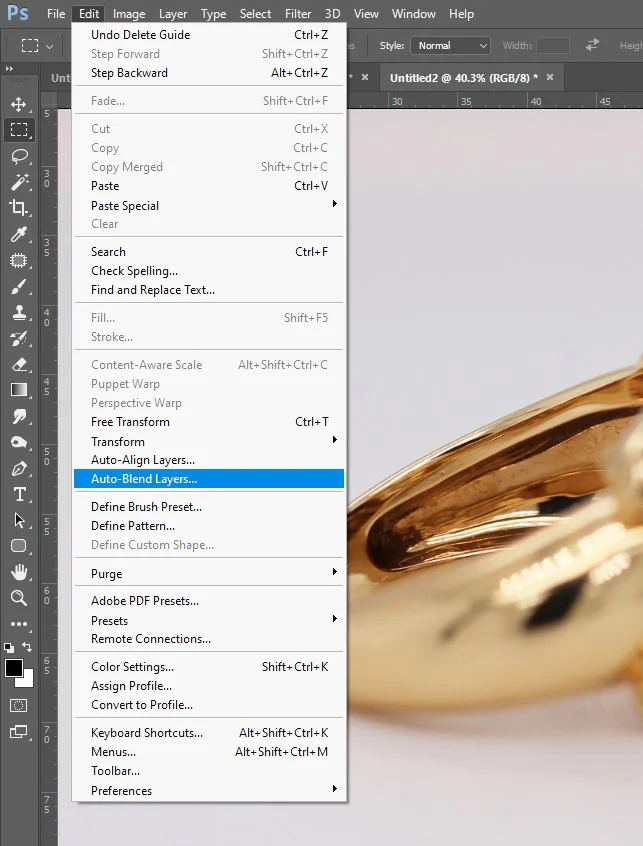
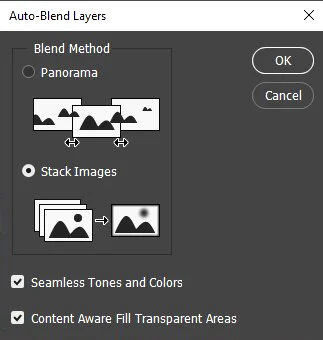
Step-3: Auto-Blend Layers in Photoshop
Now come to the main part. When all layers are in the same alignment, then click “Edit” again and select “Auto-Blend Layers. After clicking, you’ll see a dialogue box with options “Panorama” and “Stack Images”. Click the option “Stack Images”. Make sure both “Seamless Tones and Colors” and “Content Aware Fill Transparent Areas” both box is checked. Like the screenshot below, and then click OK.
Photoshop will generate complex layer masks for each file, hiding the blurry parts and revealing the sharp details.
The older version of Photoshop was a bit slow for stacking, but it has improved rapidly. When utilizing focus stacking in Photoshop 2026 and newer updates, you will notice significant improvements in processing speed and AI-driven masking capabilities.
The newer algorithms are much better at identifying complex edges and handling tricky transitions between foreground and background elements.
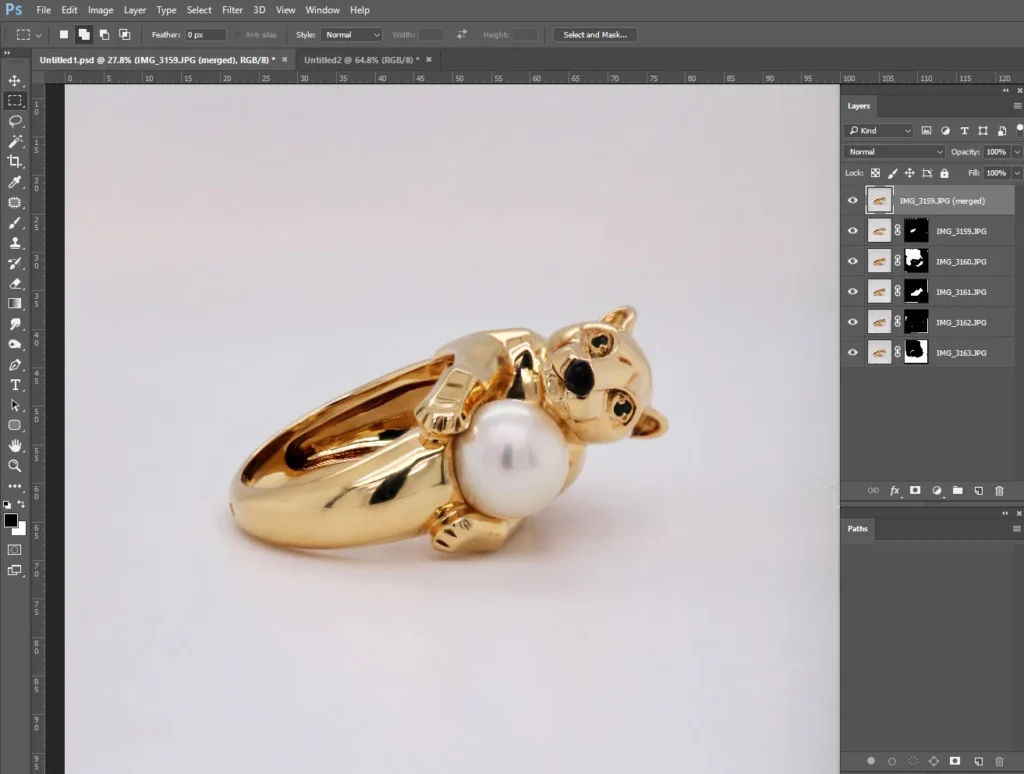
Step-4: Final Photo
After completing the stacking, you’ll see a final layer in the layer window. See the screenshot below.
Despite these advancements, the algorithm is not always perfect. Cleaning up the mask is sometimes necessary.
If Photoshop gets confused by overlapping edges, complex backgrounds, or areas lacking contrast, it might create a blurry patch. To fix this, locate the specific layer mask that contains the sharp detail the algorithm missed. Select the brush tool, set your color to white, and carefully paint over the layer mask to reveal the sharp pixels hiding underneath.
After finishing the basic adjustment, save the file in your desired format (JPG, PNG, or PSD).
Things to avoid while doing Focus Stacking
Photoshop options are relatively easy, but errors happen while doing the photoshoot. If you do product photography, you’ll understand that camera movement can ruin the composite. I have gathered some issues while doing focus stacking. If you can solve these issues, you can easily get a perfect photo. So, here they are-
Camera Movement
Camera movement is the most common culprit. A sturdy, heavy tripod is an absolute necessity. You cannot handhold a camera for this technique. While the auto-align feature can fix microscopic shifts, major movements between frames will make it impossible for the software to match the geometry, resulting in a ruined stack.
Inconsistent lighting
Inconsistent lighting will also cause merging errors. If you use artificial lighting, inconsistent flash power or recycle times can cause issues. The auto-blend tool tries to fix seamless tones, but drastic lighting changes will create ugly banding and obvious artificial seams across your final photo.
Exposure Settings
Changing your exposure settings halfway through a sequence is a guaranteed way to cause problems. Do not use Auto ISO, Auto White Balance, or Aperture Priority modes. Everything must be shot in full manual mode. Your shutter speed, aperture, ISO, and white balance must remain locked down for the entire sequence. If the depth of field or exposure changes between shots, the algorithm cannot stitch the files together cleanly.
Missing Focus
Missing focus slices will create a frustrating “halo” or blurred band effect. This happens when you do not take enough photos to cover the entire depth of the subject. If you focus on the front of a product, and your next shot jumps too far backward, the space in between will be out of focus. As a rule of thumb, you should overlap your focus points by about twenty to thirty percent.
Product Movement
If you do 360 product photography or product photography, you’ll notice product movement while doing a photoshoot. If you want to focus stacking, keep in mind product shouldn’t move. The software will try to stitch together an object that appears in different positions across the frames. If a subject does move, you will have to spend significant time manually masking out the ghosting using the layer masks in your file.
Conclusion
Mastering focus stacking is a transformative skill for any photo editor or photographer. It helps to achieve impossible sharpness and bypass the physical limitations of the camera lens.
Focus stack in Photoshop is a remarkably straightforward and automated process once you understand the basic workflow. The software algorithms do the heavy lifting, leaving you with a perfectly crisp file ready for final color grading and output.
The best way to learn is by doing. Challenge yourself to set up a simple still-life on your desk right now. Grab a small object with fine details.
If you ever feel you need external help, don’t hesitate to reach out to me. We are a jewelry photo editing company. We are working with jewelry photographers and brands to manage their jewelry photo editing.
FAQ
-
Does focus stacking work for moving subjects?
Ans: No. Focus stacking requires the subject to be perfectly still across every frame. If you’re shooting a flower in the wind or a restless insect, the software will struggle to align the shifting edges, resulting in ‘ghosting’ or blurry artifacts. For moving subjects, your best bet is to use a faster shutter speed and a single-shot approach, even if it means sacrificing some depth of field.”
-
What is the best aperture for focus stacking?
Ans: The ‘sweet spot’ for focus stacking is usually between f/5.6 and f/8. While it’s tempting to stop down to f/16 to get more in focus, doing so actually introduces diffraction, which softens your fine details. By shooting at f/8, you’re utilizing your lens at its sharpest point, leaving the heavy lifting of the depth of field to Photoshop’s stacking algorithm.
-
Can I do focus stacking in Lightroom?
Ans: Surprisingly, no. While Lightroom is a powerhouse for color grading and organization, it lacks the ‘Auto-Blend Layers’ engine required to stitch focal planes together. However, you can use Lightroom to prepare your images: simply select your sequence, right-click, and choose Edit In > Open as Layers in Photoshop. This allows you to bridge the gap between the two programs seamlessly.